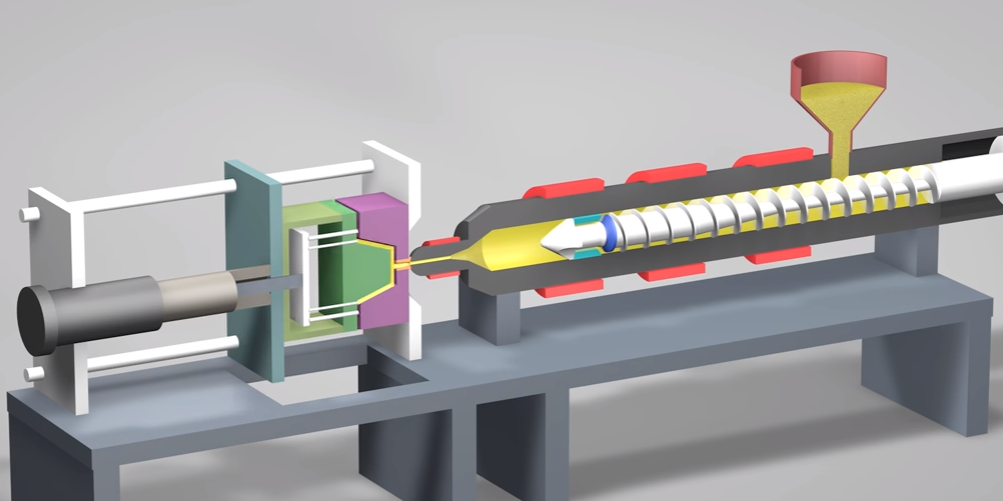
When it comes to excelling in the manufacturing industry, one must be able to keep up with the current trends. One such trend that is creating hype is Plastic Injection Molding. It is a manufacturing process in which melted polymer is injected under pressure, which in turn produces a wide range of slid plastic parts and products.
This process involves various stages that should be examined carefully when analyzing part design, tool creation, and efficient production of molded plastic products. So, let’s start with the basics.
How Does Plastic Injection Molding Work?
Here’s the rundown of the step-by-step process to execute the injection molding process.
1. The Mold Closes
The tool closed indicates the beginning of the plastic injection molding. Thereafter, resin pellets are fed from a hopper into a barrel. In certain cases, the cycle runs “part to part” which means that the cycle begins and ends when the new part touches the conveyor belt.
2. Injection
- Proceeding further, the screw rotates to auger the resin pallets toward to mold. The movement causes friction owing to which pellets start melting.
- The screw is then pushed forward while injecting the material at the appropriate force and speed necessary to fill the mold cavity. Molds can be made of single or multiple cavities. While single cavity mold can accommodate only one type of resin, multiple cavity molds can either have identical parts in each cavity or boast unique parts to create different geometrics.
- As it enters the tool, the displaced air comes out through vents in the injecting pins and along the parting line.
3. Cooling
- Once the mold’s cavity is filled, the resin is allowed to cool for a specific amount of time. Water is cycled through the heating lines or internal cooling to maintain a consistent temperature while the material hardens. The cooling time depends on the type of resin used and the thickness of the part.
4. Plasticizing the Resin
The next step of the plastic injection molding is to plasticize the resin.
- Once the resin cools down, the screw retracts and reloads the new plastic resin into the barrel through the material hooper. This process is then repeated with the next injection.
- Heaters within the barrel maintain the temperature for the type of resin being used.
5. Ejection
- The tool opens as soon as the molded resin reaches its appropriate ejection temperature and the part is pushed out by the forward motion of the ejector rod and pins.
- In addition to the manual ejection, the molded part can also be taken out by a robot operator or it falls freely into a bin placed underneath the tool to eliminate the operator.
6. Removing the Runner
While the plastic injection molding service cycle ends with the ejection of the part, the process continues.
- Once the part is ejected from the mold, it’s time to separate the usable parts from the leftover runner. Sometimes, the molded parts have pieces attached called runners. These are simply extraneous materials that gather in the channels and stick to the melted resins while they are on the way to fill the cavity.
- Runners are removed before packaging the part and are usually recycled to protect the environment and reduce costs.
The usable parts will be then weighed, counted, and sent for assembly, packaging, and shipping.


